 A sous vide cooker allows you to cook a perfect steak every time. You can buy one in the stores, but I wanted to make my own.
Background
I was introduced to sous vide (French for “under vacuum”) when I attended a talk by Jeff Potter, the author of Cooking for Geeks. Usually, if you want a steak cooked medium, you put it in the oven, set it to broil, which heats the oven up to about 450°F, and hope you can take the steak out after the middle reaches 145° but before the meat is burnt. In sous vide, you seal the meat in a plastic bag, immerse it in water, and hold the water at 145° for a few hours. It’s important to get all the air out of the bag, since air will insulate the meat from the water. We use a vacuum sealer.
Timing is not critical; if the meat is in longer than it needs to be, it won’t become well done – because the temperature is not high enough to trigger the chemical reactions that turn the meat brown – and it won’t spoil, because 145° is hot enough to kill bacteria.
A simple thermostat won’t do for controlling the temperature. A thermostat would wait until the temperature is 145° before turning off the power to the heating element. But the heating element would not drop to room temperature immediately: it would transfer more heat to the water, sending it above 145°. So sous vide cooking uses a microcontroller running a Proportional/Integral/Derivative (PID) algorithm. This is a scheme to predict how fast the water temperature will rise in response to turning the heat on, and how long it will continue to rise after turning the heat off.
You can buy sous vide cookers, but it’s become popular in the Maker community to make your own sous vide controller and to use it to turn a crock pot, deep fryer, or hot plate on and off as needed.
The Project
 I based the sous vide controller on my Black Knight development platform. For the user interface, I chose a Crystalfontz LCD display module that I got cheap on eBay. This module was designed for mounting in a disk drive bay, so it made sense to put the sous vide controller in an attractive, professionally-made external drive enclosure.
I installed AC power sockets in the back panel. To power the electronics, I just put an old 9V DC adapter in the box. There’s also a solid state relay so that the microcontroller can turn the cooking device on and off.
I’ve started building a C++ framework using template metaprogramming for managing the peripherals on the STM32 microcontroller in the Black Knight. It’s not ready for public consumption yet, but I hope to do an article on it later. By using template metaprogramming, I can have it generate code every bit as efficient as what you’d write if you were manipulating the hardware registers directly in C. For the PID algorithm, I used Brett Beauregard’s open source code at brettbeauregard.com.
 The controller can drive a deep fryer, a crock pot, or a hot plate. We’ve been using a hot plate with a big pot of water. I drilled a hole in a metal lid and mounted the temperature probe in it.
The front panel shows the desired temperature and the current temperature. The up and down arrows let you change the desired temperature. If it’s ever necessary to re-calibrate the temperature sensor, the left and right arrows take you to a UI for doing that.

The rear panel has three things plugged into it: the AC power, the hot plate’s power cord, and the temperature sensor (which I foolishly wired to a barrel connector similar to the old PS/2 computer keyboard connectors; I had forgotten how much I hate those connectors, since it’s so difficult to orient them correctly.)
The Results
When meat comes out of the sous vide, it looks rather unappetizing. The outside is slightly browned, but not as dark as when it’s cooked in an oven or on a grill. Also, because the meat was sealed in a vacuum bag, it has an imprint of the seams from the bag. It looks like industrial food product. Frying or grilling the meat for a short time improves the appearance. Some people like to use propane torches for browning the outside, but we haven’t tried that yet.


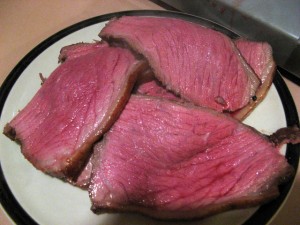
When you cut into the meat, the color is uniform throughout. Here’s a steak and a roast we made. The steak was a little dry – cooking too long in the sous vide is biologically safe, but tends to dry the meat (on the other hand, it also makes it more tender). The roast beef stayed juicy, partly because we cooked it a shorter time and partly because it’s larger. (The roast looks like it’s redder in some spots than others, but that’s because of juice puddling, not because it was cooked unevenly.)


But I like my meat burnt. 145 F won’t do it.
Just for you, I reprogrammed the sous vide’s maximum temperature to 300 F.
Burn, baby, burn.